If you have a Ford that uses a fuel pump driver module, it can be bypassed for testing.
This can be a good way to test if the module is bad or possibly get the vehicle home in an emergency.
I recently ran into this problem with a 2008 Ford F-150 that had a fuel issue.
The code on an OBDII scan tool was a P1237 Fuel Pump Secondary Circuit Malfunction.
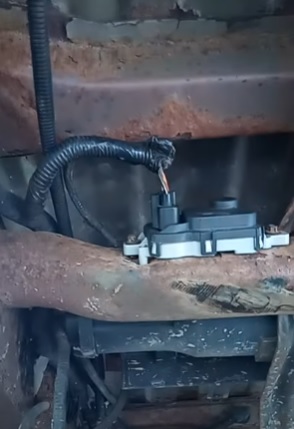
The fuel pump driver module is located at the rear of the vehicle.
Before bypassing the module be sure it is getting 12-volts DC or there is another problem.
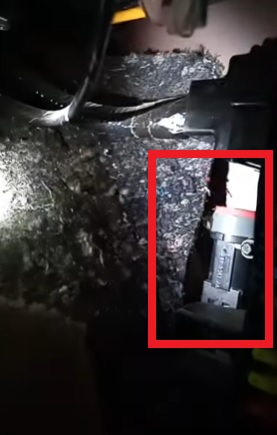
There is an inertia switch on the passenger side of the 2008 Ford F-150 that controls the fuel pump along with relays in the fuse box.
Do the Following at Your Own Risk. While I did not have any Issues, I Can Not Be Responsible If Something Goes Wrong.
How To Bypass 2008 Ford F-150 Fuel Pump Driver Module
Here is a wiring diagram of a 2008 Ford F-150 Driver Module pins.
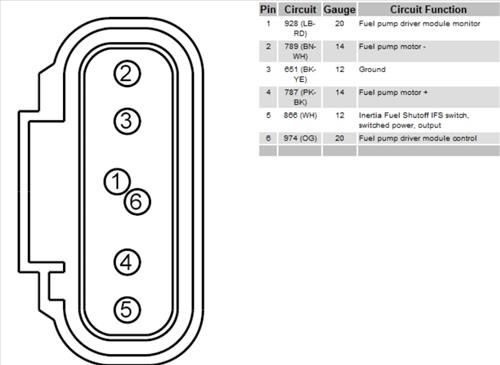
- Pin 1: Fuel Pump Driver Module Monitor
- Pin 2: Fuel Pump Motor
- Pin 3: Ground
- Pin 4 Fuel Pump Motor +
- Pin 5: Inertia Fuel Shutoff IFS Switch. Switched Power Output
- Pin 6: Fuel Pump Driver Module Control
The pins are not numbered in a line, so it can be a bit confusing but below is how it is wired.
Be sure to see a diagram for the make, year, and model of your Ford, as there may be variations.
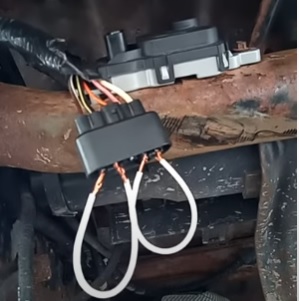
The outer wires of the plug are 12-volts from the battery (white) and module ground (brown).
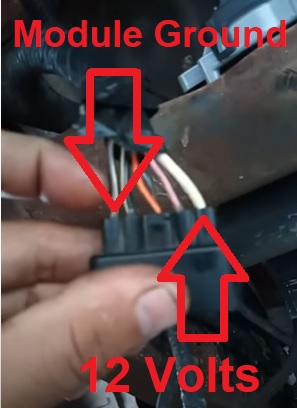
The black/yellow wire is fuel pump ground, while the pink/black wire is 12 volts for the fuel pump.
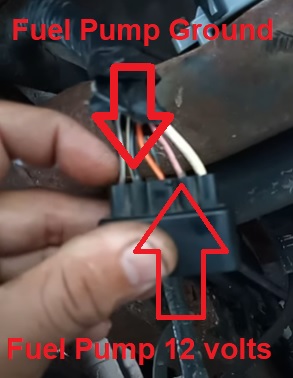
Jumper the grounds together and the 12-volts to the 12-volt for the fuel pump will bypass the module.
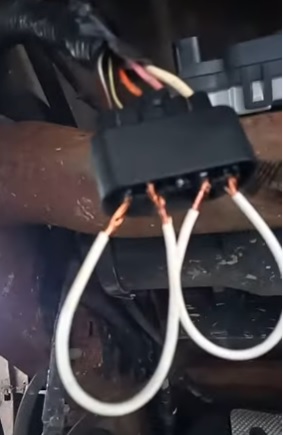
Basically, the outer left pins and outer right pin are jumpered together.
Summary
Jumpering a 2008 Ford F-150 fuel pump driver module is straightforward by sending 12-volt and ground to the fuel pump.
First, Google a wiring diagram for your Ford to be sure the wiring is the same.
The jumper is likely the same across many types, but it is best to check a diagram to be sure.
If the fuel pump is not working, be sure to check for 12-volts on the white wire, or the jumper will not work as the module may be good.
Common Ford OBDII codes for a bad module include P1237 Fuel Pump Secondary Circuit Malfunction and PO191 Fuel Rail Sensor.
Have you had to wire a jumper for a Ford fuel pump driver module? Let us know your thoughts below.
Great tips on bypassing the fuel pump driver module! I’ve been having trouble with my Ford, and your step-by-step instructions made it so much easier to understand. Thanks for sharing your expertise!
I throw you thank you for your help. It was remarkably well found out.
How you described fix problem. No, my hands need to ask you a question. I could, if you please please hit me back up and let me know why I’m not getting power 2. My module, my gas and light hand hand if I take the battery and I hook it and hook it back up. It will work one time trying to switch off. Turn it back on. It didn’t work anymore when I happened. I never met getting power to back. Give a module any 80 advisory appreciate.
I’m trying to hardwire a fuel tank from a 2005 f250 to a 91 f150 and need to bypass the factory fuel system
I have same issue with my 05. Did you figure out problem? I am stumped
Did you ever get it fixed I have the same problem
Hi, your videos are extremely helpful. I was having fuel pump issues and with your videos I was able to work on the issues. I replaced the fuel pump and the fuel pump module on my 2005 Ford F150. How ever, I was not able to fix the problem. After getting everything back together, My vehicle still would not start. So I went back in test mode again, I jumped the new Fuel pump module the my vehicle would start and run. Ok, so I thought I maybe bought a defected module. I ordered another new one. Put that one in and still no start. Ok, now I’m thinking I have a electrical issue. I have power from the fuse box to the inertia switch and out to the module. Yes, I did check and reset the inertial switch. This as far as have gotten at this point. I can only assume, by jumping the module that everything should be good out to the fuel pump. I’ll be doing more test this week end. Any input would be greatly appreciated.
Thank you.
I AM HAVING THE SAME ISSUE. WITH MY VOLT METER I HAVE DETERMINED THE CONNECTOR TO BE AT FAULT